I make a commission from purchases made through links in my posts, at no extra cost to you. Read my disclosure for more information.
I made this signal layer heat transfer vinyl (HTV) shirt design with my Cricut EasyPress 2. I used iron-on mesh vinyl for this project and it is perfect for parents, and their kid’s biggest sports fans. I even created a short video and a Cricut design file so you can make this signal vinyl design for yourself too! You can find both in this post.
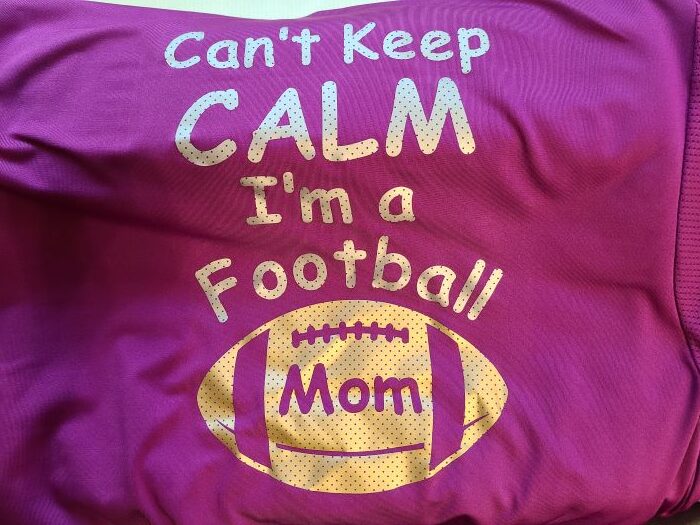
Since my son plays football and I already made him his own custom shirt with his jersey number with layered vinyl design. (If you want to see the layered vinyl post go here!) I wanted to get in on the action and made my own custom shirt. You can see from the image below here is what my shirt looks like. This design will work great for dads and maternity shirts as well!
Product Used To Make A Cricut EasyPress 2 Shirt Using HTV
These are affiliate links.
- Polyester T-Shirt – https://nerdymomsunited.com/recommends/polyester-shirt
- Cricut EasyPress2 – https://nerdymomsunited.com/recommends/cricut-easypress
- Cricut EasyPress Mat – https://nerdymomsunited.com/recommends/cricut-easypress
- Cricut Mesh iron-on vinyl – https://nerdymomsunited.com/recommends/cricut-mesh-iron-on
Subscribe to Nerdy Moms United!
Get updates on the latest posts and more straight to your inbox!
How To Use A Cricut EasyPress 2 To Make A Shirt – Tutorial
These are the steps I use to make a shirt using a Cricut EasyPress 2 and a signal layer of heat transfer vinyl (HTV).
- Cut your design out of the vinyl with the shiny side down on your cutting mat and mirror image turned on.
- Preheat you Cricut EasyPress 2 following the Cricut EasyPress Heating Setting Chart here! (You can find this chart at the bottom of the post.)
- The Cricut button will turn “Green” when the EasyPress 2 is ready to be used on your project.
- Put your EasyPress Mat inside your shirt and pre-press the area where you would like add your design to go for 5 seconds. (This will remove extra moister from the design area.)
- Place your design (shiny side up) on the shirt where the EasyPress Mat is located.
- Following the project directions for your iron-on material time and temperature. Info can be found here (https://cricut.com/en_us/heatguide or see the chart below)
- Put the EasyPress 2 on top of your vinyl design and set the time.
- Remove EasyPress 2 when the timer is done.
- For the leave the clear backing on from your vinyl layer on the shirt. (Very important step!)
- Remove your EasyPress Mat inside your shirt.
- Turn the shirt inside out so the design is now on the inside.
- Put your EasyPress Mat inside your shirt with the vinyl design sitting in the middle of your mat.
- Make sure the clear backing is still attached to the vinyl design.
- Put the EasyPress 2 on top of the vinyl layer and set the time.
- Remove EasyPress 2 when the timer is done.
- Let the vinyl layer and shirt cool.
- Turn the shirt right-side out so the design is now on the outside of the shirt.
- Peel the clear backing from your vinyl design.
Very important tip: Don’t forget! When you do any heat press or transfer projects that your image and text needs to be a mirror image. You must do this before you run your project through the Cricut machine or everything will be backward! Unless that was your plan for the project from the beginning!
My downloadable Cricut template has the layout for moms and dads so you don’t have to change a thing. Only print the template you need for the shirt you want to design.
I used a polyester shirt and the Cricut mesh iron-on. The EasyPress 2 should be set to 315 Fahrenheit for 30 seconds. Once the front is done I flipped the shirt inside out and pressed the back of the design for 15 seconds. I removed the clear transfer liner when the design was cool to the touch.
You can get the download of this Cricut SVG signal layer vinyl project file, so you can make this craft for yourself.
How To Use A Cricut EasyPress 2 To Make A Shirt – Video
Here is a video detailing all of the steps of how I did this signal layer vinyl shirt project with my Cricut EasyPress.

Cricut EasyPress Heating Setting Chart
This chart below details the heat settings and timing for the different material that you can use with the Cricut heat transfer vinyl and iron-on product line. Feel free to print this post so you can save this chart for yourself. In each block the heat setting is on top and the timing for the transfer is in seconds on the lower half of the dividing line. The letter in parentheses is telling you how to set the Mini EasyPress. (L) is for the Low setting and the (M) is for the medium setting. I included a detailed notes section at the bottom of the chart for how to use the Mini EasyPress settings.
| Cricut EasyPress Heating Setting Chart | ||||||
|---|---|---|---|---|---|---|
| Warm Peel | Cold Peel | |||||
| Everyday, Lite, & Metallic |
Glitter | Holographic | Sport-Flex | Foil | Patterned | |
| Burlap | 305F (M) 30s |
305F (M) 30s |
305F (M) 30s |
Don’t Use | Don’t Use | Don’t Use |
| Cotton | 315F (M) 30s |
330F (M) 30s |
330F (M) 30s |
Don’t Use | 295F (L) 30s |
340F (M) 50s |
| Cotton/ Poly Blend |
315F (M) 30s |
330F (M) 30s |
330F (M) 30s |
Don’t Use | 295F (L) 30s |
340F (M) 50s |
| Cotton/ Canvas |
340F (M) 50s |
270F (L) 30s |
285F (L) 30s |
Don’t Use | 290F (L) 30s |
340F (M) 50s |
| Felt | 280F (L) 30s |
270F (L) 30s |
285F (L) 30s |
Don’t Use | 280F (L) 30s |
265F (L) 20s |
| Jersey Mesh | 280F (L) 30s |
Don’t Use | Don’t Use | Don’t Use | 280F (L) 30s |
Don’t Use |
| Polyester | 315F (M) 30s |
330F (M) 30s |
330F (M) 30s |
305F (M) 30s |
295F (M) 30s |
Don’t Use |
| Silk | 280F (L) 30s |
Don’t Use | Don’t Use | Don’t Use | 255F (L) 30s |
Don’t Use |
| Nylon | 280F (L) 30s |
Don’t Use | Don’t Use | 305F (L) 30s |
255F (L) 30s |
Don’t Use |
| Cardstock | 280F (L) 30s |
290F (L) 30s |
290F (L) 30s |
Don’t Use | 270F (L) 30s |
290F (L) 30s |
| Chipboard | 315F (M) 30s |
315F (M) 30s |
315F (M) 30s |
Don’t Use | Don’t Use | 315F (M) 30s |
| Faux Leather | 280F (L) 30s |
270F (L) 30s |
285F (L) 30s |
Don’t Use | 280F (L) 30s |
265F (L) 20s |
| Wood | 300F (M) 40s |
300F (M) 40s |
300F (M) 40s |
Don’t Use | Don’t Use | 305F (M) 30s |
| Cricut EasyPress Mini Heat Settings: (L) – Low: For lightweight, delicate, synthetic, or heat-sensitive fabrics; also great for more delicate heat-transfer vinyl, such as Foil Iron-On. Use with sensitive base materials or heat-transfer materials that transfer between 255°F (125°C) – 295°F (145°C). (M) – Medium: For most fabrics and heat-transfer vinyl. Use with most base materials or heat-transfer materials that transfer between 300°F (150°C) – 355°F (180°C). (H) – High: For Infusible Ink projects and blanks. Use with Infusible Ink materials, heavy-duty base materials, and other heat-transfer materials that transfer between 360°F (185°C) – 400°F (205°C). |
||||||
Can I Use An Iron Instead Of The Cricut EasyPress 2?
You can use a standard iron but you run the risk of dealing with inconsistent heating temperatures on your project. This can cause two problems.
- A low temperature iron will cause your iron-on vinyl to not stick to your project and it will peel of in the washer machine.
- A over heated iron will cause your iron-on vinyl to burn on your project and can leave scorch marks on your fabric.
This is why I don’t use a regular iron to do my heat transfer and iron-on projects. I have seen too many iron-on failed projects and my share of frustration from inconsistent heating temperatures from a regular iron. Please don’t make the same mistake I did! I had a project I spent hours on, to only have it ruined a week later by one washing.
Talk about a big disappointment! If I’m going to spend time on a project, I am not going to waste my time doing it halfway. I admit I am a perfectionist when it comes to my craft projects and as a mom, I have very little free time to do them again. I know every mom can relate to that!
I know I had a squirrel moment there! Dang those squirrels! Back to my battle with the iron and why the EasyPress 2 has solved my iron-on project woes.
I’ve had iron-in projects ruined from uneven heating because I did not have an EasyPress 2 at the time. I will explain why! A regular iron will not get hot enough, an iron is not able to provide even steady pressure and heat, and/or wide enough to complete the project. All of the iron-in transfer materials will require different heat settings and heating time for the transfer to be completed. The EasyPress 2 has an easy temperature and timer controls, to take the guesswork and frustration out of your projects.
Want to learn more about Cricut? Check out my other Cricut posts!
What is a Cricut EasyPress 2?
What is a Cricut BrightPad?
What Is Cricut Access?
Which Cricut Machine Is Right For You?
Cricut Pen Adaptor Hack
What is Cricut Infusible Ink and how to use it?
10 Cricut Infusible Ink Hacks
How to Design a Mug with Cricut Infusible Inks In The Oven
How To Use Cricut Removable Matte Vinyl On Your Wood Project? – Illustrated Tutorial
How To Use Cricut Adhesive Foil Vinyl On Wood Furniture? – Illustrated Tutorial
How To Design A Color Changing Mug Using Cricut Infusible Ink
-
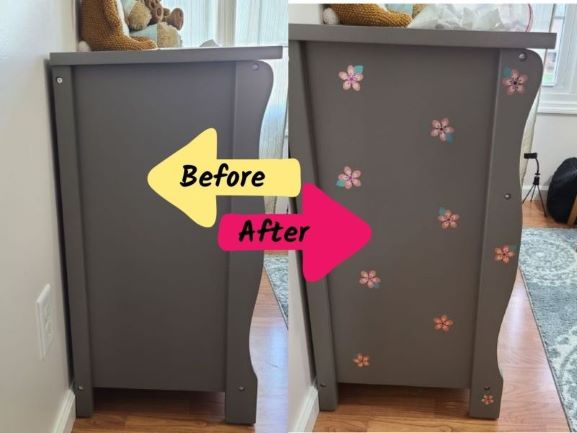
How To Use Cricut Adhesive Foil Vinyl On Wood Furniture – Tutorial
I will show you step by step how I decorated a painted wooden dresser with Cricut adhesive foil vinyl to create custom wood furniture. I decorated a painted wooden dresser with Cricut adhesive foil vinyl in my daughter’s nursery…
-
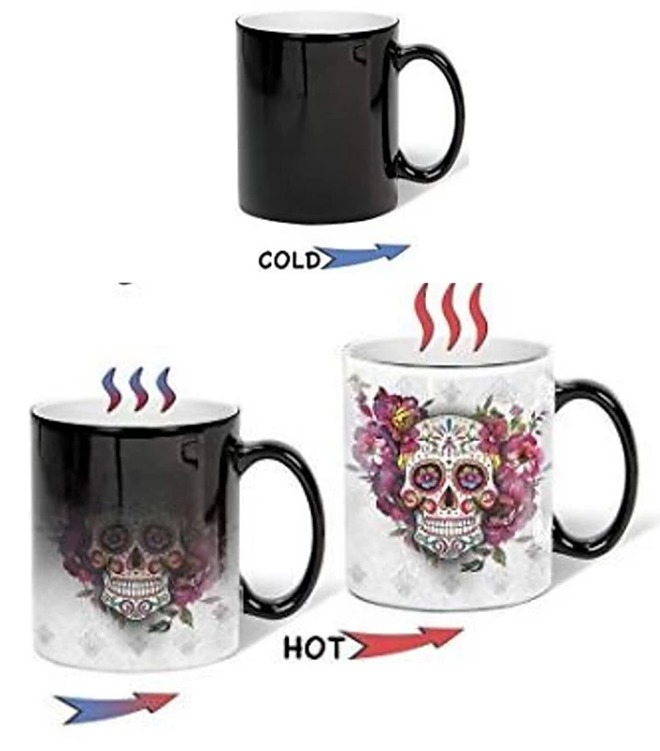
How To Make A Color Changing Mug Using Infusible Ink In The Oven – Tutorial & Video
How to make a color changing mug with Cricut Infusible Ink in the oven. Do you know you can use Cricut Infusible Inks on a mug without a mug press? …
-
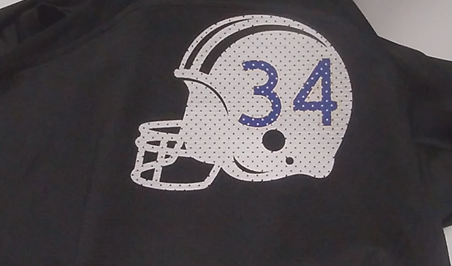
How To Make A Layered Iron-On Vinyl Shirt Using A EasyPress 2 – Tutorial & Video
This layered Cricut EasyPress 2 iron-on mesh vinyl project is perfect if your kids play football. I even created a short video and a Cricut design file so you can make this layered vinyl design for your child too! …
Subscribe to Nerdy Moms United!
Get updates on the latest posts and more straight to your inbox!
I hope this post was helpful to you in do a signal layered vinyl EasyPress 2 project!

I make a commission from purchases made through links in my posts, at no extra cost to you. Read my disclosure for more information.
Looking for more craft project ideas?
-
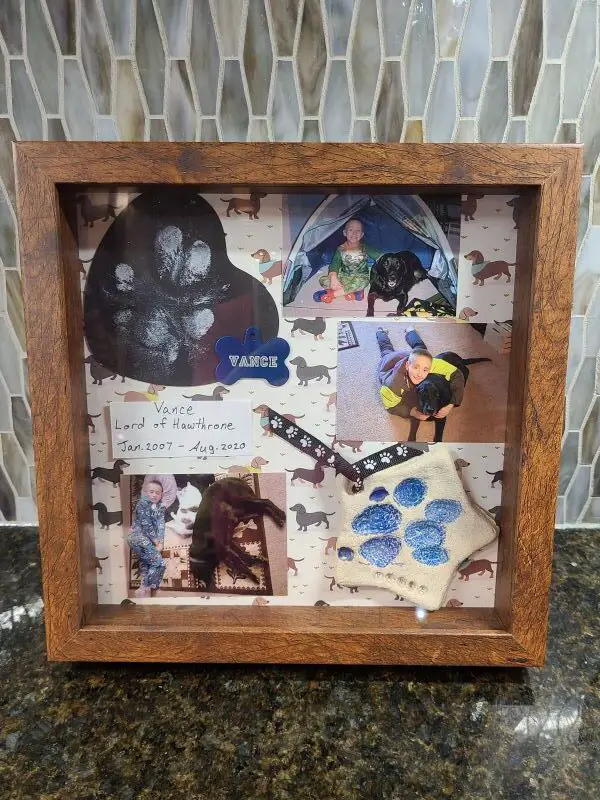
How To Make A Shadow Box Memorial Layout For Your Dog
I will show you how to make a shadow box memorial layout for your dog. This a beautiful way to remember your cherished dog with this shadow box memorial idea for your dog…
-
How To Use Cricut Adhesive Foil Vinyl On Wood Furniture – Tutorial
I will show you step by step how I decorated a painted wooden dresser with Cricut adhesive foil vinyl to create custom wood furniture. I decorated a painted wooden dresser with Cricut adhesive foil vinyl in my daughter’s nursery…
-
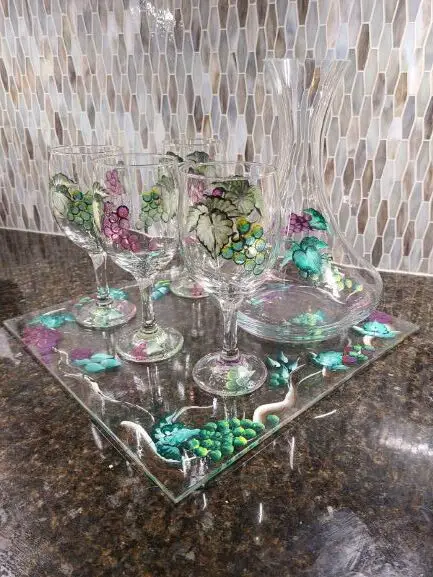
How To Seal Hand Painted Glassware – Illustrated Tutorial
This illustrated tutorial will show you how to seal your hand painted glassware at home the right way. Using acrylic paint to hand paint your own stemware?…
-
How To Make A Color Changing Mug Using Infusible Ink In The Oven – Tutorial & Video
How to make a color changing mug with Cricut Infusible Ink in the oven. Do you know you can use Cricut Infusible Inks on a mug without a mug press? …
-
How To Make A Layered Iron-On Vinyl Shirt Using A EasyPress 2 – Tutorial & Video
This layered Cricut EasyPress 2 iron-on mesh vinyl project is perfect if your kids play football. I even created a short video and a Cricut design file so you can make this layered vinyl design for your child too! …
-
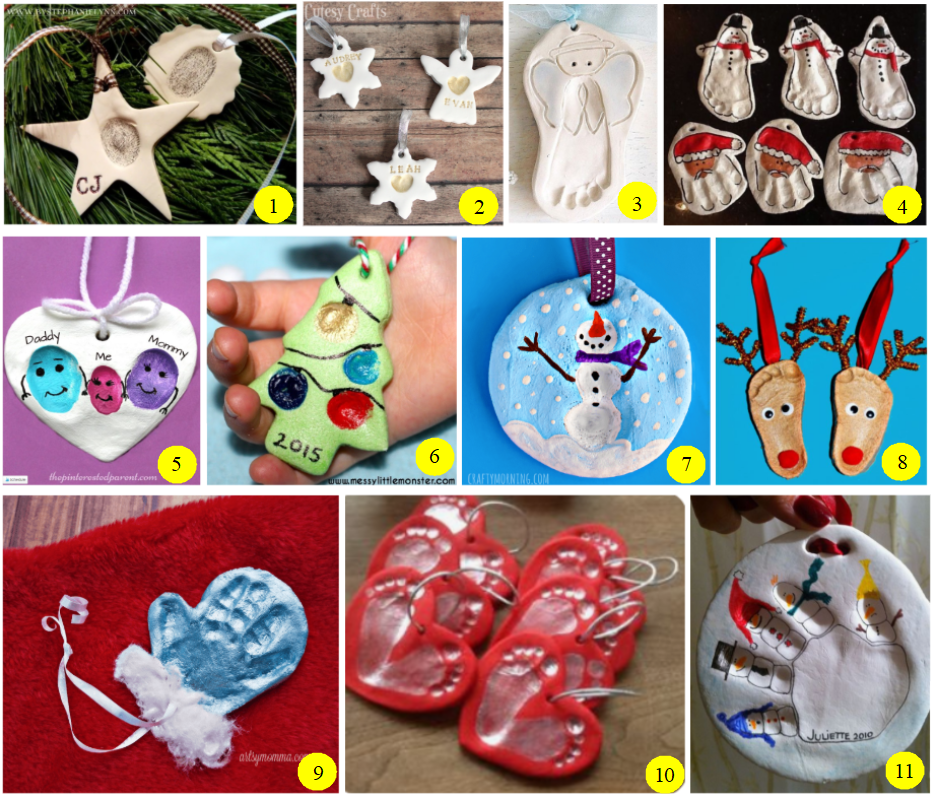
Easy Salt Dough Christmas Ornaments for Kids to Make as Gifts
These beautiful smelling salt dough Christmas ornaments are easy for kids to make as gifts. With this easy salt dough recipe, and several fun crafts ideas that kids can make…
I cannot thank you enough for the article post. Thanks Again. Awesome. Veda Stevy Boff
You’re welcome! I am glad I was able to help you out.